Easy Lunch & Snack Boards Effortless Entertaining
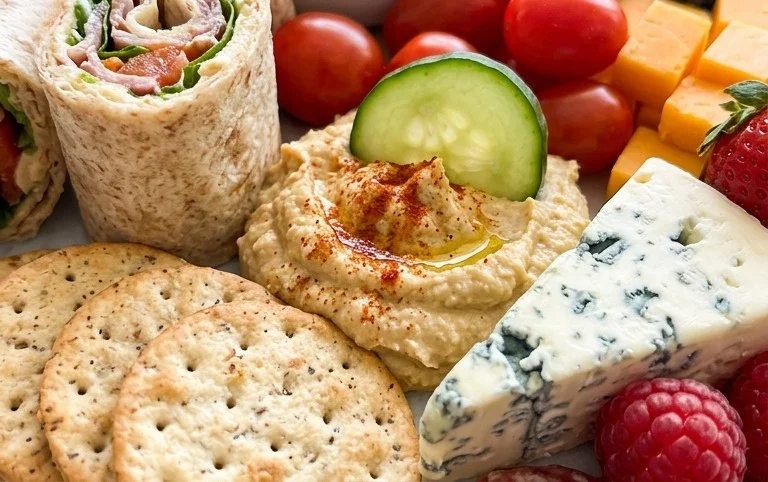
Easy Lunch and Snack Boards are your new best friend when hunger strikes and you’re short on time or inspiration. Forget the complicated cooking – these vibrant platters are all about effortless assembly and maximum flavor. What’s not to love? They offer an incredibly satisfying, yet wonderfully simple way to create a delicious meal or delightful snack that feels both gourmet and incredibly approachable. People adore them because they’re endlessly customizable, catering to every craving and dietary need. One of the most special aspects of these easy lunch and snack boards is their visual appeal; they’re a feast for the eyes before they even become a feast for the palate. They transform simple ingredients into something truly delightful, proving that deliciousness doesn’t require hours in the kitchen.
Ready to discover your new go-to mealtime solution?
Easy Lunch and Snack Boards
Let’s face it, sometimes the idea of cooking a full meal for lunch can feel overwhelming, especially on a busy weekday. And snacking? We all do it, but often we reach for the same old things. That’s where the beauty of lunch and snack boards comes in! They are the ultimate in effortless entertaining and delicious, satisfying meals. Think of them as a customizable feast, a collection of bite-sized delights that you can assemble in minutes. The best part is, there’s no “right” or “wrong” way to build a board. It’s all about what you have on hand and what sounds good to you.
These boards are fantastic for feeding yourself a delightful lunch, for a quick afternoon pick-me-up, or even for an informal gathering of friends. They encourage a little bit of everything, offering a delightful variety of flavors and textures. Forget spending ages in the kitchen; these boards are designed for maximum enjoyment with minimum effort. We’re going to focus on creating something truly special, even if it’s just for yourself!
Ingredients:
* Assorted Cheeses (e.g., cheddar, brie, gouda, goat cheese)
* Cured Meats (e.g., beef salami, beef prosciutto, beef pepperoni)
* Crackers and Bread (various types: water crackers, baguette slices, whole wheat crackers)
* Fresh Fruits (e.g., grapes, berries, apple slices, pear slices)
* Dried Fruits (e.g., apricots, figs, cranberries)
* Nuts and Seeds (e.g., almonds, walnuts, pistachios, sunflower seeds)
* Vegetables (e.g., cucumber slices, carrot sticks, bell pepper strips, cherry tomatoes)
* Dips and Spreads (e.g., hummus, cream cheese, mustard, jam)
* Olives and Pickles
* Optional: Honey, chocolate squares, fresh herbs for garnish
Building Your Board: Step-by-Step
Creating an impressive and delicious lunch or snack board is incredibly simple. It’s more about arranging than actual cooking. Here’s how you can put together a stunning board that’s as beautiful as it is tasty.
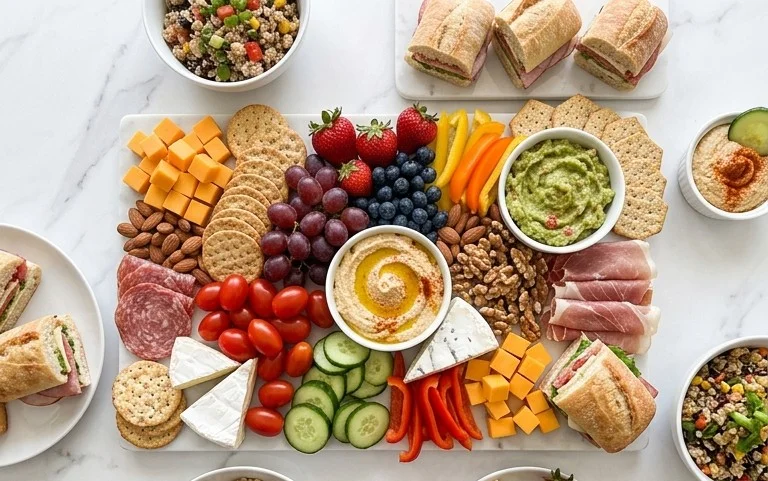
1. Choose Your Vessel: The foundation of your board is its serving surface. This could be a wooden cutting board, a slate platter, a large ceramic plate, or even a baking sheet lined with parchment paper. The size will depend on how many people you’re serving. For a solo lunch, a smaller board or even a large plate will do perfectly. For a family or friends, opt for something larger. Think about the overall aesthetic you want to achieve.
2. Anchor with Larger Items: Start by placing your larger items on the board. This usually includes your cheeses and any bowls for dips or spreads. If you’re using a wedge of brie, place it as a central focal point. If you have multiple cheeses, distribute them around the board to create balance. For dips, use small ramekins or bowls and nestle them into the board. This helps to contain any potential mess and adds visual interest. Don’t be afraid to cut some of the cheese into cubes or slices, while leaving others whole to showcase their natural shapes.
3. Add Your Proteins: Next, introduce your cured meats. You can fold slices of beef salami or beef prosciutto into rustic rosettes or fan them out. Arrange them near the cheeses, as they are natural companions. If you’re using other meats like sliced turkey or beef ham, stack them neatly. This layer adds substance and a savory element that perfectly complements the cheese. Consider how the colors of the meats will look next to the cheeses and other ingredients.
4. Incorporate Your Carbs: Now it’s time for the crackers and bread. Arrange them in clusters around the board, making sure there are plenty of them to scoop up all the delicious toppings. You can use a variety of shapes and sizes to add texture and visual appeal. Staggering them or placing them in gentle curves can make the board look more abundant. If you’re using baguette slices, consider toasting them lightly for an added crunch.
5. Fill in with Fruits and Vegetables: This is where you add pops of color and freshness. Scatter grapes, berries, and sliced fruits in the empty spaces. Arrange vegetable sticks and cherry tomatoes around the board. Fruits and vegetables not only add visual appeal but also offer a refreshing contrast to the richer flavors of the cheese and meats. Think about seasonality – what fruits and vegetables are at their best right now?
6. Add the Finishing Touches: Finally, fill in any remaining gaps with nuts, dried fruits, olives, and pickles. These smaller items are perfect for filling those little nooks and crannies, making your board look full and inviting. A drizzle of honey over a wedge of brie, or a sprig of fresh rosemary tucked in can elevate the presentation even further. Don’t forget to sprinkle in some chocolate squares or other small sweet treats if you’re feeling indulgent! The goal is to make sure there are no bare spots, creating a beautiful mosaic of deliciousness.
Enjoy building your own edible masterpiece!
Conclusion:
Crafting these easy lunch and snack boards has been such a joy, and I truly believe they are a game-changer for busy weeknights and relaxed weekends alike. The beauty of these boards lies in their incredible versatility and the sheer simplicity of their assembly. They eliminate the stress of individual meal prep and instead offer a delightful, communal way to enjoy delicious and nutritious bites. Whether you’re feeding a family, hosting a casual get-together, or simply treating yourself to a satisfying solo meal, these boards are a fantastic option. Don’t be afraid to get creative with your selections – the possibilities are truly endless!
For serving, these boards are perfect for a casual brunch, a light lunch, or an impressive appetizer spread. They also make fantastic additions to picnics or potluck contributions. Remember, the goal is to have fun and assemble a board that reflects your favorite flavors. Experiment with different cheeses, fruits, veggies, dips, and proteins to discover your ultimate combination.
Frequently Asked Questions:
What are some good protein options for a lunch board?
Excellent protein choices include sliced deli meats like turkey or beef ham, hard-boiled eggs, grilled chicken strips, smoked salmon, chickpeas, edamame, and cubes of cheese.
Can I make a lunch board ahead of time?
Yes, you can prepare many components of your easy lunch and snack boards in advance. Chop vegetables, prepare dips, and slice cheeses the day before. Assemble the board a few hours ahead, and cover it tightly with plastic wrap before refrigerating. Add delicate items like fresh berries just before serving to maintain their freshness and vibrancy.
What if I have dietary restrictions or preferences?
These boards are wonderfully adaptable! For gluten-free options, include gluten-free crackers, rice cakes, or vegetable sticks. For vegetarian or vegan boards, focus on a variety of plant-based proteins like hummus, roasted chickpeas, nuts, seeds, and abundant fresh fruits and vegetables. Simply tailor the ingredients to suit your needs.
Easy Lunch and Snack Boards
Create beautiful and delicious lunch and snack boards with simple ingredients for any occasion.
Ingredients
-
Crackers
-
Cheese
-
Fruit
-
Vegetables
-
Deli meat (e.g., turkey, ham)
-
Nuts
-
Olives
Instructions
-
Step 1
Select a variety of crackers as your base. Include different shapes and textures. -
Step 2
Arrange a selection of cheeses. Offer a mix of hard and soft cheeses, and different flavors. -
Step 3
Add fresh fruits. Grapes, berries, and sliced apples are great options. -
Step 4
Incorporate fresh vegetables. Carrot sticks, cucumber slices, and bell pepper strips are popular choices. -
Step 5
Include deli meats. Roll or fold slices of turkey or ham for visual appeal. -
Step 6
Fill in any gaps with small bowls of nuts and olives for added variety and flavor.
Important Information
Nutrition Facts (Per Serving)
It is important to consider this information as approximate and not to use it as definitive health advice.
Allergy Information
Please check ingredients for potential allergens and consult a health professional if in doubt.