Easy Mini Animal Cracker Cookies Recipe Fun
Mini Animal Cracker Cookies are an absolute delight for both the young and the young at heart! If you’re looking for a sweet treat that’s bursting with nostalgic charm and undeniable fun, then look no further. We all have fond memories of those colorful, crunchy animal crackers, right? Well, imagine taking that beloved flavor and transforming it into a soft, chewy, homemade cookie – that’s the magic we’re creating today. These Mini Animal Cracker Cookies aren’t just about replicating a taste; they’re about capturing a feeling of joy and simple pleasure. What makes them truly special is their adaptability. They’re perfect for lunchboxes, birthday parties, or just a little afternoon pick-me-up. Get ready to bake up a batch of happiness that’s as adorable as it is delicious!
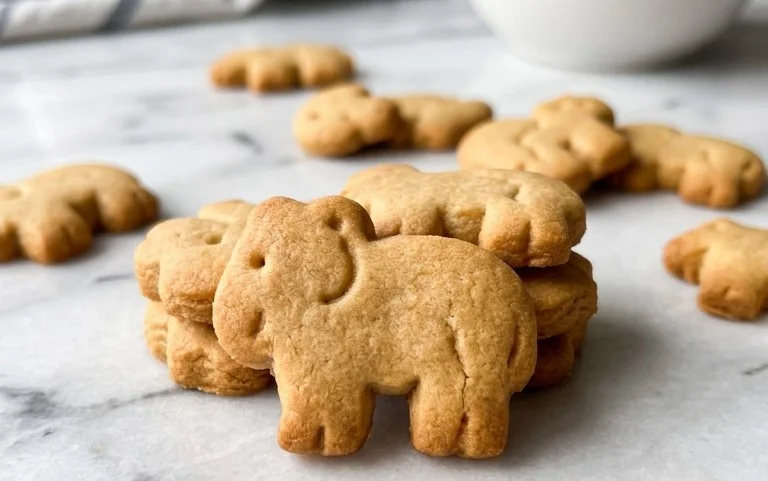
Mini Animal Cracker Cookies
Get ready for some serious fun in the kitchen! These Mini Animal Cracker Cookies are a delightful twist on a classic childhood favorite. Imagine all the whimsical charm of your favorite animal crackers, but in a homemade cookie form, ready to be decorated with vibrant icing and cheerful sprinkles. These are perfect for birthday parties, school treats, or just a sweet afternoon pick-me-up. They’re surprisingly easy to make, and the decorating process is where the real magic happens. So, gather your little helpers (or just embrace your inner child yourself!) and let’s create some edible art.
Ingredients:
- 2 and 1/4 cups (281g) all-purpose flour (spooned & leveled), plus more as needed for rolling and work surface
- 1 teaspoon ground cinnamon
- 1/2 teaspoon baking powder
- 1/4 teaspoon salt
- 3/4 cup (12 Tbsp; 170g) unsalted butter, softened to room temperature
- 3/4 cup (150g) granulated sugar
- 1 large egg, at room temperature
- 1 and 1/2 teaspoons pure vanilla extract
- Royal Icing or Easy Cookie Icing
- optional: food coloring*
- rainbow sprinkles
Instructions:
Step 1: Prepare Your Dry Ingredients and Preheat Your Oven
Begin by preheating your oven to 350°F (175°C). Line your baking sheets with parchment paper. This simple step is crucial for preventing sticking and ensuring your beautiful cookies slide right off the pan once baked. In a medium bowl, whisk together the all-purpose flour, ground cinnamon, baking powder, and salt. Whisking these dry ingredients together ensures that the leavening agents and salt are evenly distributed throughout the dough, which leads to consistent cookie texture and rise. Set this bowl aside for now.
Step 2: Cream the Butter and Sugar
In a large bowl, using an electric mixer (either a stand mixer with a paddle attachment or a hand mixer), cream together the softened unsalted butter and granulated sugar until the mixture is light and fluffy. This process, known as creaming, incorporates air into the dough, which contributes to a tender cookie. Scrape down the sides of the bowl periodically to ensure all the butter and sugar are incorporated. You’re looking for a pale yellow, airy consistency. This usually takes about 3-5 minutes of beating. Don’t rush this step; it’s foundational for great cookie texture.
Step 3: Add Wet Ingredients and Combine
Add the large egg and pure vanilla extract to the creamed butter and sugar mixture. Beat again until just combined. Be careful not to overmix at this stage; we just want to break up the egg and incorporate the vanilla evenly. The egg acts as a binder and adds richness to the cookie dough. Next, gradually add the dry ingredient mixture to the wet ingredients, mixing on low speed until just combined. The dough will start to come together. If the dough seems too sticky to handle or roll, you can add a little more flour, about a tablespoon at a time, but be careful not to add too much, as this can make your cookies tough. You want a soft, pliable dough.
Step 4: Chill and Roll the Dough
Turn the dough out onto a lightly floured surface. Gently bring the dough together and divide it into two or three discs. Wrap each disc tightly in plastic wrap. Refrigerate the dough for at least 30 minutes, or up to 2 days. Chilling the dough is a vital step for several reasons. It firms up the butter, which prevents the cookies from spreading too much in the oven, resulting in thicker, more substantial cookies. It also makes the dough much easier to roll out without sticking to your work surface. Once chilled, take one disc at a time (keeping the others in the refrigerator) and place it on a lightly floured surface. Roll the dough out to about 1/4-inch thickness. A consistent thickness is key to even baking.
Step 5: Cut and Bake Your Mini Animals
Using your favorite small animal-shaped cookie cutters, cut out your mini animal cracker cookies. Re-roll the scraps gently, chilling the dough again if it becomes too soft, and cut out more shapes until all the dough is used. Carefully transfer the cut-out cookies to your prepared baking sheets, leaving about 1-inch of space between them. Bake in the preheated oven for 8-12 minutes, or until the edges are lightly golden brown. The exact baking time will depend on the size of your cookie cutters and your oven. Keep a close eye on them during the last few minutes to prevent over-baking. Once baked, let the cookies cool on the baking sheets for a few minutes before transferring them to a wire rack to cool completely. This is crucial before decorating, as warm cookies will melt the icing.
Step 6: Decorate Your Critters!
Once your cookies are completely cool, it’s time for the fun part – decorating! Prepare your royal icing or cookie icing according to the package directions. If you’re using food coloring, divide the icing into small bowls and tint each with your desired colors. Fit piping bags with small round tips, or use zip-top bags with the corner snipped off, and fill them with your colored icing. Use the icing to draw outlines and fill in the shapes of your animal cookies. You can get creative here, mimicking real animal patterns or going for bold, abstract designs. Before the icing sets, immediately sprinkle your decorated cookies with rainbow sprinkles for added sparkle and texture. Let the icing dry completely before stacking or storing your adorable Mini Animal Cracker Cookies. Enjoy your delicious, homemade creations!

Conclusion:
I hope you’ve enjoyed learning how to make these adorable and delicious Mini Animal Cracker Cookies! This recipe is truly a winner because it’s incredibly easy to whip up, perfect for little helpers in the kitchen, and results in a batch of wonderfully chewy, sweet cookies that everyone will adore. The simple ingredients and straightforward process mean you can have these delightful treats ready in no time for any occasion. They’re not just a cookie; they’re a mini celebration!
These Mini Animal Cracker Cookies are wonderfully versatile. Serve them at birthday parties, school events, or simply as a special afternoon treat. They pair perfectly with a glass of cold milk, hot cocoa, or even a cup of tea for the grown-ups. For a fun twist, try adding a sprinkle of colored sugar before baking, or dipping half of the cooled cookies in melted white or dark chocolate for an extra touch of indulgence. Don’t be afraid to experiment with different sprinkles or even try incorporating a tiny bit of lemon zest into the dough for a brighter flavor profile. I truly encourage you to give this recipe a try – I’m confident you’ll love the results as much as I do!
Frequently Asked Questions:
Can I use store-bought animal crackers instead of making the dough from scratch?
While this recipe focuses on making the cookies from scratch for the freshest flavor and texture, you could potentially crush store-bought animal crackers very finely and use them as a mix-in to a basic sugar cookie dough. However, the texture and taste will be quite different from these original Mini Animal Cracker Cookies.
How should I store these cookies?
Store your cooled Mini Animal Cracker Cookies in an airtight container at room temperature for up to 3-4 days. They might lose a little of their chewiness after the first day, but they’ll still be delicious!
Can I make these cookies gluten-free?
Yes, you can absolutely make these cookies gluten-free! You’ll need to substitute a good quality gluten-free all-purpose flour blend for the all-purpose flour in the recipe. You may also need to slightly adjust the liquid content depending on the blend you use.
Mini Animal Cracker Cookies
Delightful mini cookies that mimic the classic animal cracker taste and appearance, perfect for parties and fun baking projects.
Ingredients
-
2 and 1/4 cups (281g) all-purpose flour (spooned & leveled), plus more as needed for rolling and work surface
-
1 teaspoon ground cinnamon
-
1/2 teaspoon baking powder
-
1/4 teaspoon salt
-
3/4 cup (12 Tbsp; 170g) unsalted butter, softened to room temperature
-
3/4 cup (150g) granulated sugar
-
1 large egg, at room temperature
-
1 and 1/2 teaspoons pure vanilla extract
-
Royal Icing or Easy Cookie Icing
-
optional: food coloring*
-
rainbow sprinkles
Instructions
-
Step 1
In a medium bowl, whisk together the flour, cinnamon, baking powder, and salt. Set aside. -
Step 2
In a large bowl, cream together the softened butter and granulated sugar until light and fluffy. -
Step 3
Beat in the egg and vanilla extract until well combined. -
Step 4
Gradually add the dry ingredients to the wet ingredients, mixing on low speed until just combined. The dough will be soft. -
Step 5
Divide the dough in half, flatten each half into a disk, wrap in plastic wrap, and refrigerate for at least 1 hour, or until firm enough to roll. -
Step 6
Preheat oven to 350°F (175°C). Line baking sheets with parchment paper. -
Step 7
On a lightly floured surface, roll out one disk of dough to about 1/8-inch thickness. Use mini animal cookie cutters to cut out shapes. Transfer cookies to the prepared baking sheets. -
Step 8
Bake for 8-10 minutes, or until the edges are lightly golden. Let cookies cool on the baking sheets for a few minutes before transferring to a wire rack to cool completely. -
Step 9
Once cooled, decorate with royal icing or cookie icing, food coloring (if using), and rainbow sprinkles.
Important Information
Nutrition Facts (Per Serving)
It is important to consider this information as approximate and not to use it as definitive health advice.
Allergy Information
Please check ingredients for potential allergens and consult a health professional if in doubt.